

 お困りさん
お困りさんブログにはお問い合わせフォームが必要と聞いたけど、プラグインで作るしかないのかな?
このような方に向けて本記事では、プラグインを使わずにGoogleフォームでブログのお問い合わせフォームを作る方法についてご紹介しています。
プラグインを使うのが定番のお問い合わせフォームですが、
- 余計にプラグインを増やしたくない
- 普段からGoogleツールをよく利用している
という方にとっておすすめしたい方法です!
ブログの不具合にはプラグインの影響がつきもの。
プラグインの数は、必要最小限にしたいですよね!
記事内では、
- Googleフォームの作成方法
- 固定ページへの設置方法
について、実際の画面の画像を使って詳しくお伝えしています。
ぜひ参考にして、Googleフォームでブログのお問い合わせフォームを作ってみてくださいね^^
Googleフォームでブログのお問い合わせフォームを作るメリット
お問い合わせページに設定するフォームをGoogleフォームで作ると、以下3つのメリットがあります。
3つのメリット
- プラグインを使わずに済む
- お問い合わせ内容を一覧で確認できる
- お問い合わせメールが消えてしまっても安心
それぞれひとつずつご紹介していきます!
①プラグインを使わずに済む
お問い合わせフォームを設置するためには、【Contact Form 7】というプラグインが定番としてよく使われています。
ただしプラグインを増やしていくと、
- サイトが重くなり、表示スピードが遅くなる
- 他のブラグインと干渉する
という可能性もあります。
お困りさん必要以上に増やさないことが大切なんだね!
本記事でご紹介するGoogleフォームを活用すれば、プラグインを増やさずに簡単にお問い合わせフォームを作ることができます。
プラグインの代用として、とてもおすすめです!
②お問い合わせ内容を一覧で確認できる
Googleフォームから送信されたお問い合わせ内容は、Googleフォームにログインすれば簡単に一覧を確認できます。
振り返りに便利!
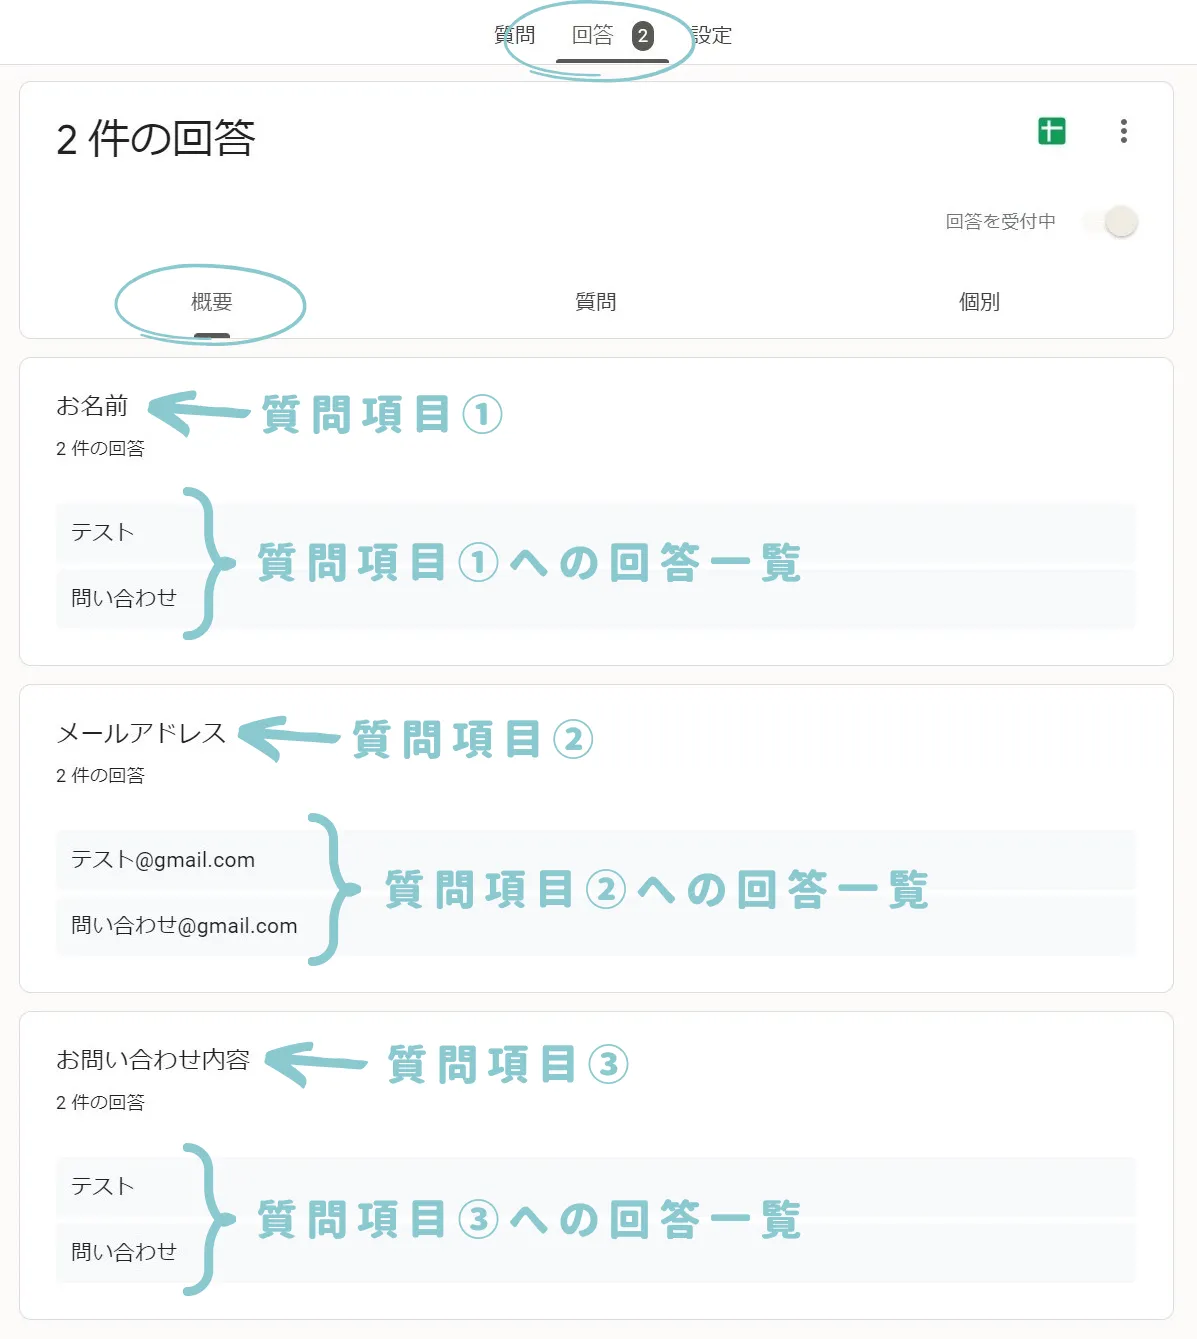
確認するには、まず”回答”タブをクリックします。

そのあと、
- 概要
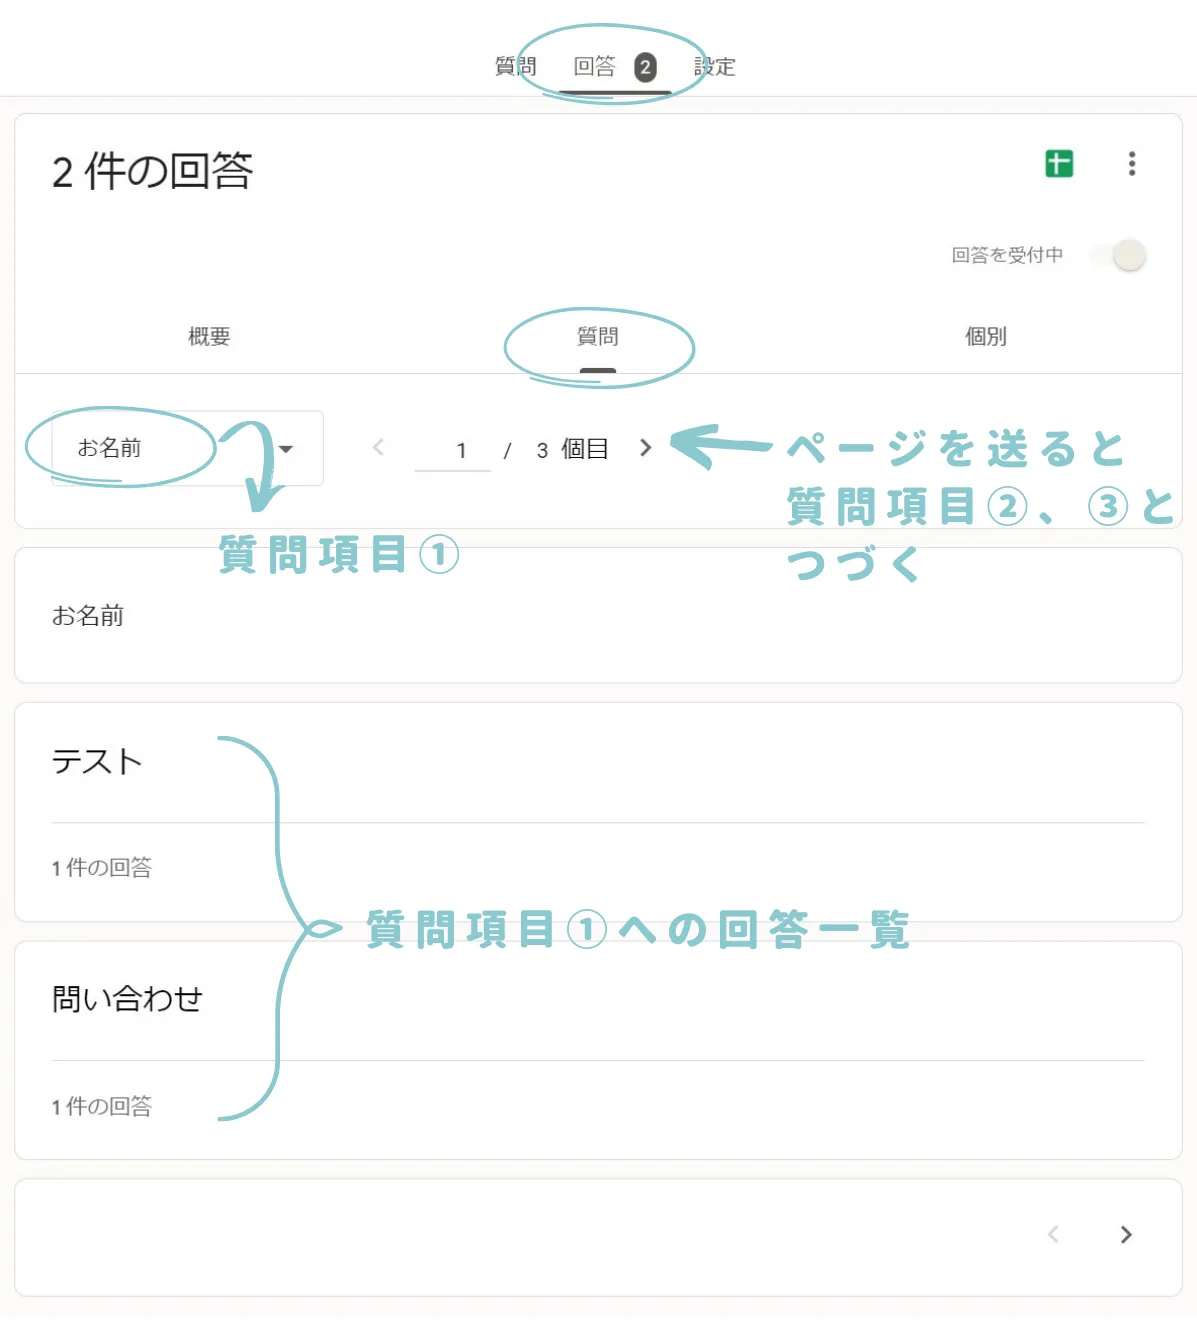
- 質問
- 個別
の3種類の確認方法でそれぞれお問い合わせ内容をチェックすることができます。
以下の例では、【テスト】と【問い合わせ】という2件の架空のお問い合わせ送信者から、それぞれ当ブログのお問い合わせフォームに回答しています。
- 当ブログお問い合わせフォームの質問項目は、【①お名前】・【②メールアドレス】・【③お問い合わせ内容】の3つです。
この場合に、どのように回答が確認できるのかを一覧にしました。(タブをクリックで切替できます。)
①概要で分かること
お問い合わせ送信者全員の回答が、質問項目別に一覧で確認できる
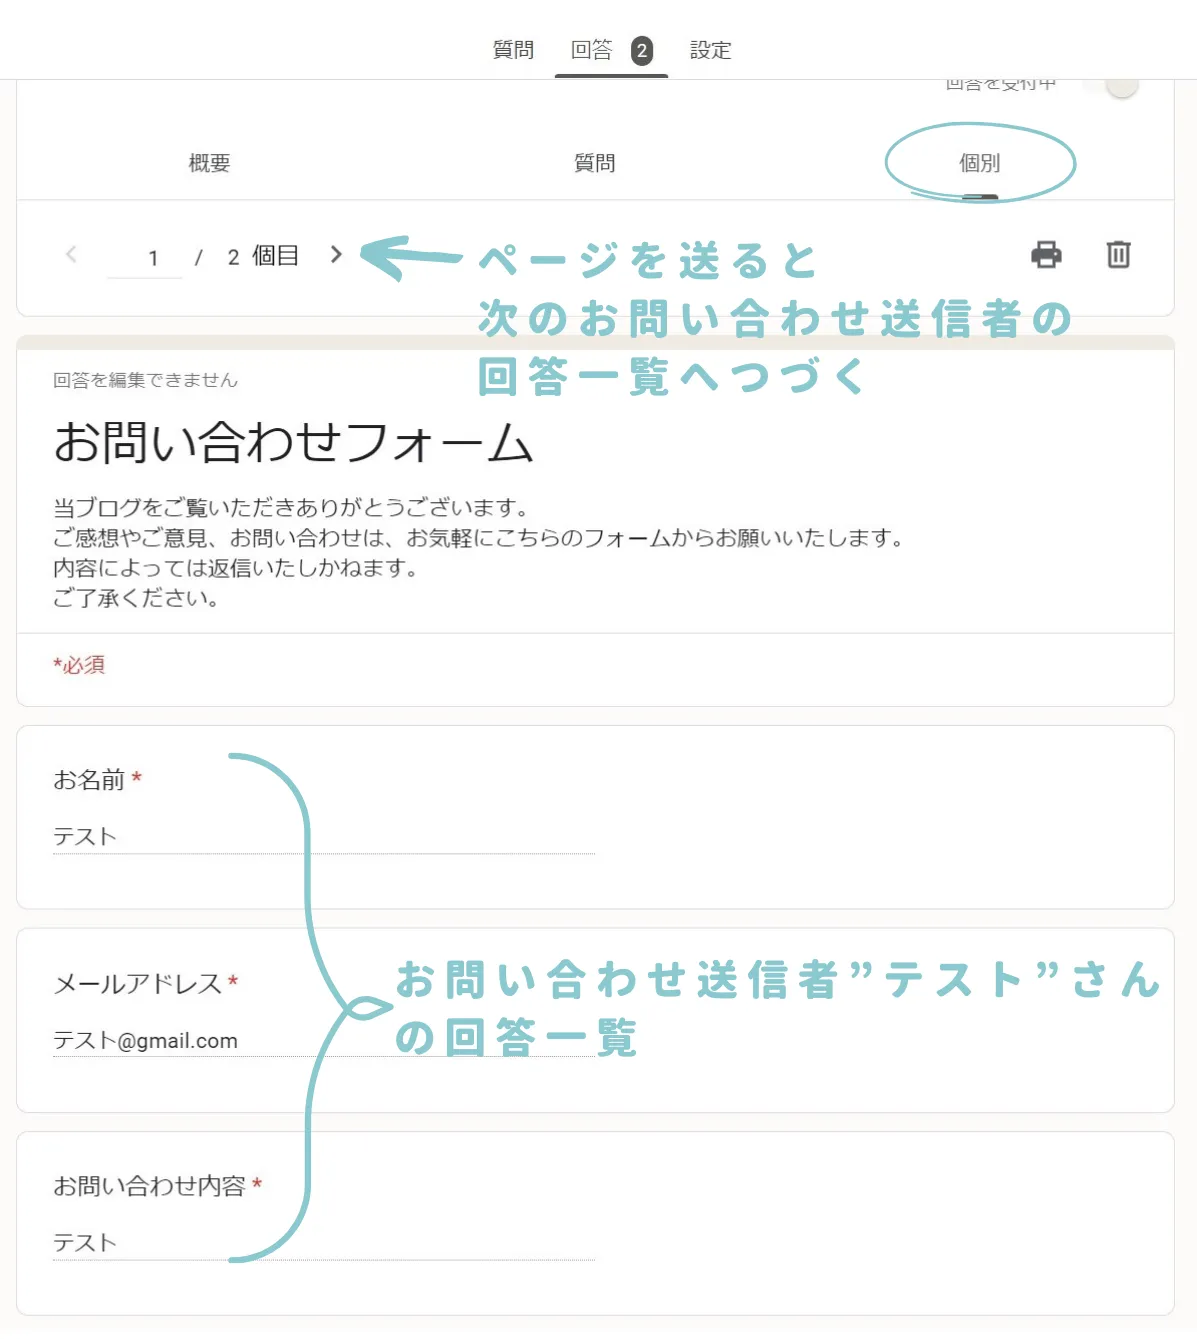
”個別”が一番分かりやすいので、確認方法としておすすめです!
③お問い合わせメールが消えてしまっても安心
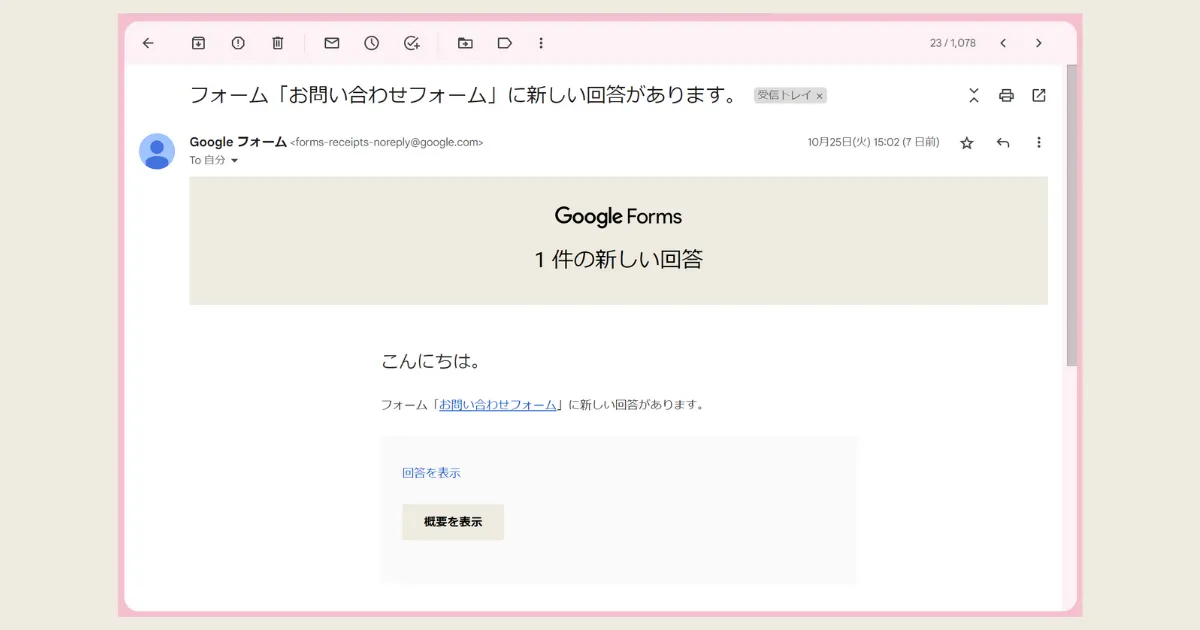
Googleフォームでは、お問い合わせが来た際にメールで通知するように設定が可能です(→設定方法はこちら)。
しかし、その通知メールをうっかり消してしまったり、ほかのメールに埋もれてしまったり…という場合も考えられます。
お困りさんせっかくのお問い合わせメールがぁ…。
そんな場合でも、前述②のとおりGoogleフォームにログインさえすれば、簡単にお問い合わせ内容を確認することができます。
万が一のときにも安心できますよ♩
Googleフォームでブログのお問い合わせフォームを作成・設置する手順
Googleフォームを利用するには、Googleアカウントが必要です。
Googleアカウントをお持ちでない場合は、あらかじめアカウントを作成しておきましょう。
アカウントが準備できたら、
- Googleフォームの作成
- 固定ページへの設置
の順で、設定を進めていきます。
それぞれ、実際の画面で解説しながらお伝えしていきます!
なお、当ブログはワードプレステーマ:SWELLを使用していますので、異なるテーマを使用している場合は参考として画面画像をご覧ください。
①Googleフォームの作成方法


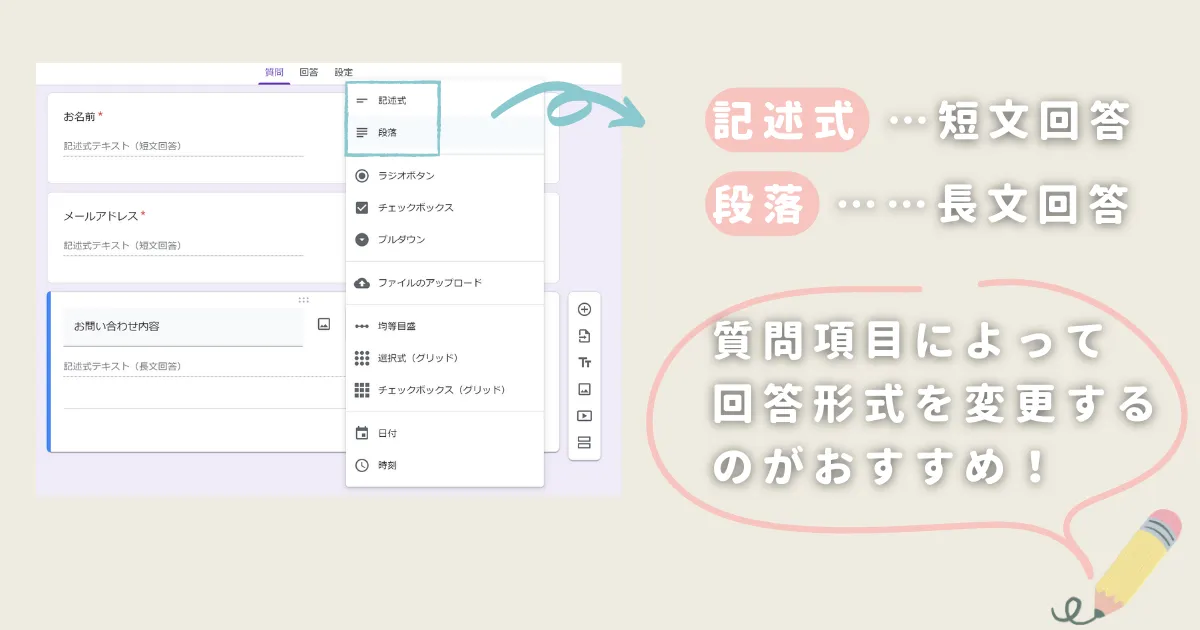
文字を入力できる回答形式には、
- 記述式
- 段落
の二種類が用意されています。
お問い合わせ内容など文章が長くなりそうな質問項目には、長文回答ができる【段落】を選ぶといいでしょう。
ここまででお問い合わせフォームの作成が完了です。
お困りさん意外と簡単!
あとは固定ページに設置すればOKですよ◎
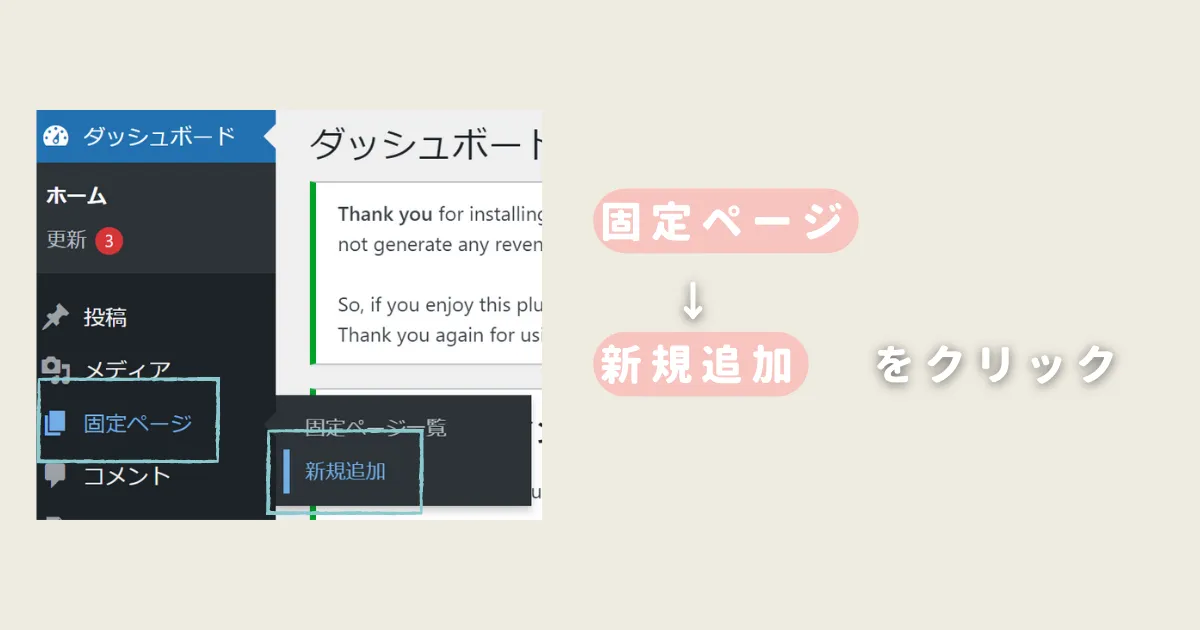
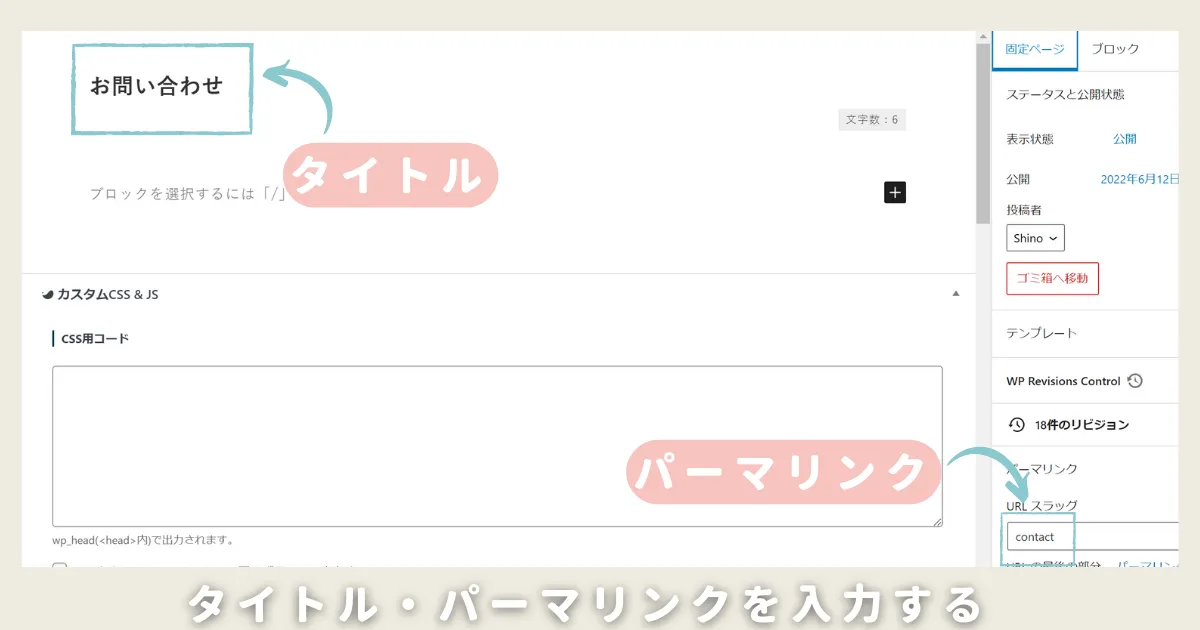
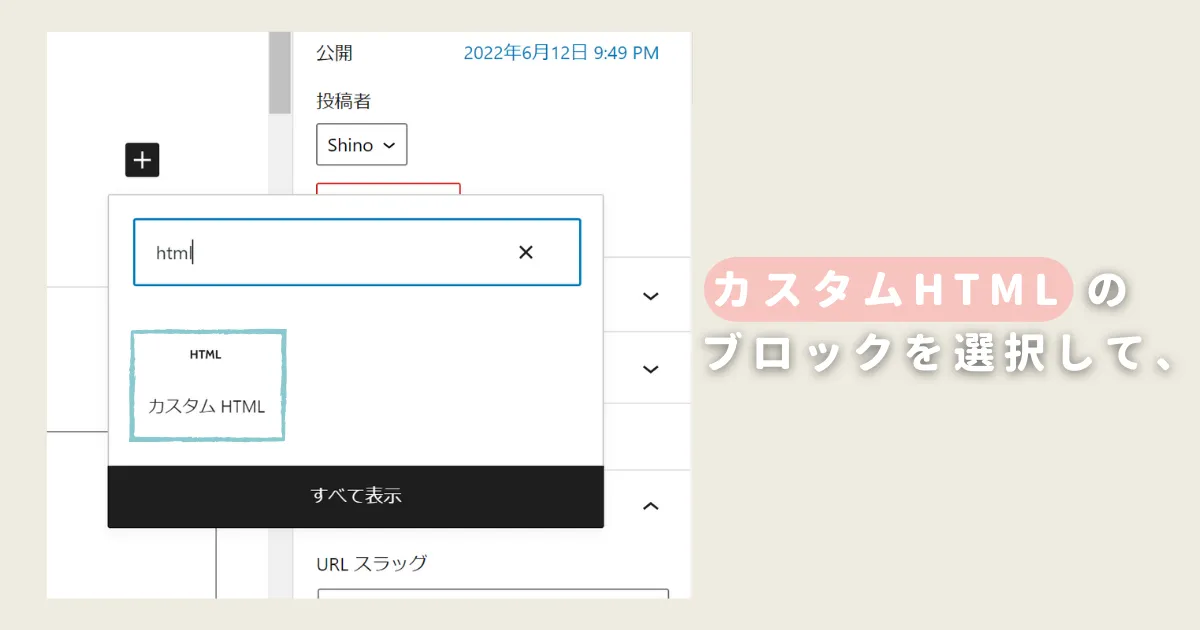
②固定ページへの設置方法【SWELLバージョン】
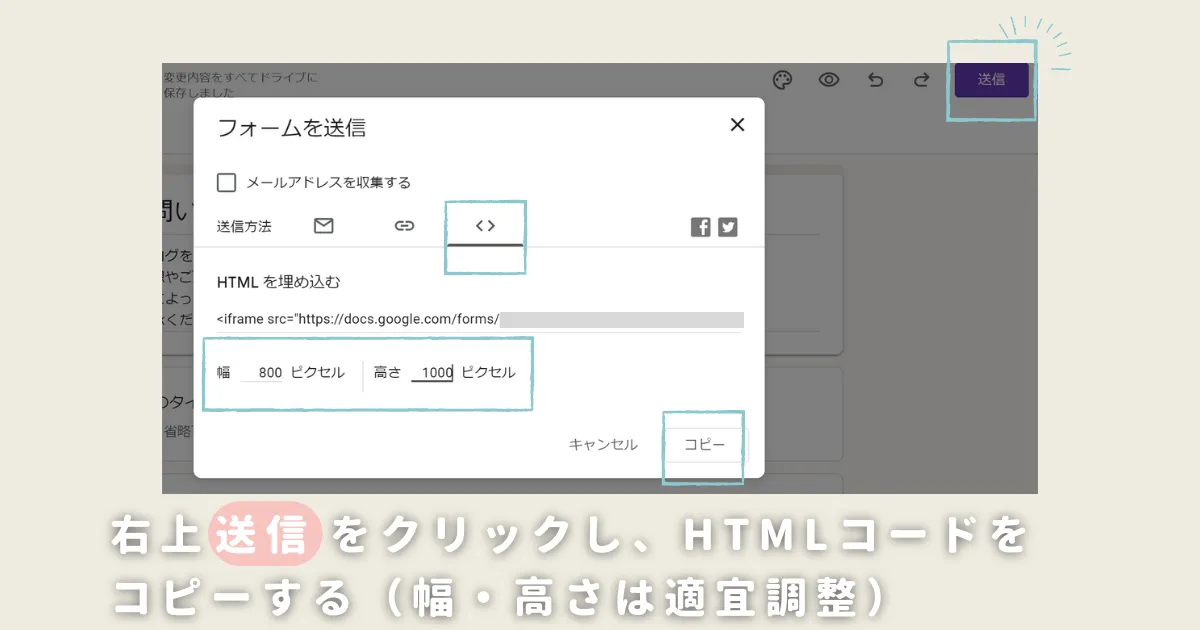
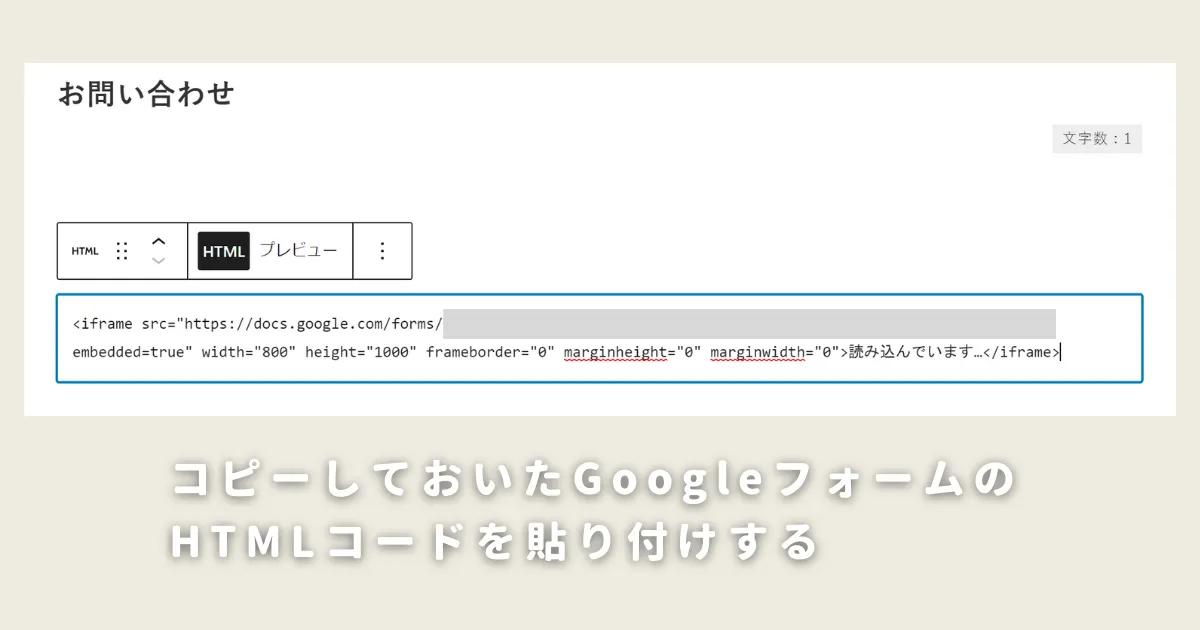
埋め込みサイズの幅・高さは、ご自身のサイトに合わせて適宜調整してください。
当ブログは、
【幅:800px】×【高さ:1000px】
に設定しています!
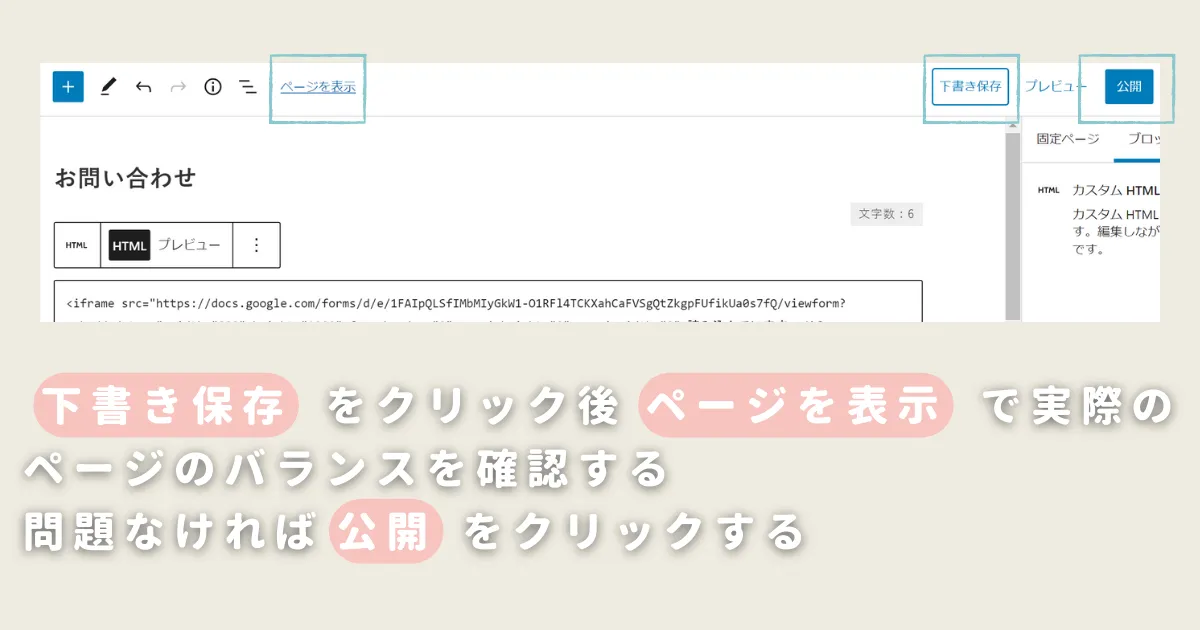
以上のステップで、このようなお問い合わせフォームをブログに公開することができます。
ぜひ参考にしてみてください^^
必須!Googleフォームで設定しておきたい項目
Googleフォームをブログのお問い合わせフォームとして利用するにあたって、かならず設定しておきたい2つの項目をご紹介します。
設定必須項目
- メール通知設定
- お問い合わせがあったときにメールで通知してくれる
- 確認メッセージ設定
- お問い合わせ送信後の確認メッセージをカスタマイズできる
それぞれご紹介していきます!
①メール通知設定
Googleフォームは、デフォルトでは回答があったときのメール通知がOFFになっています。
お困りさんメール通知が来ないと、せっかくのお問い合わせに気付けない…!
そこで、以下のようにメール通知が来るように設定する必要があります。
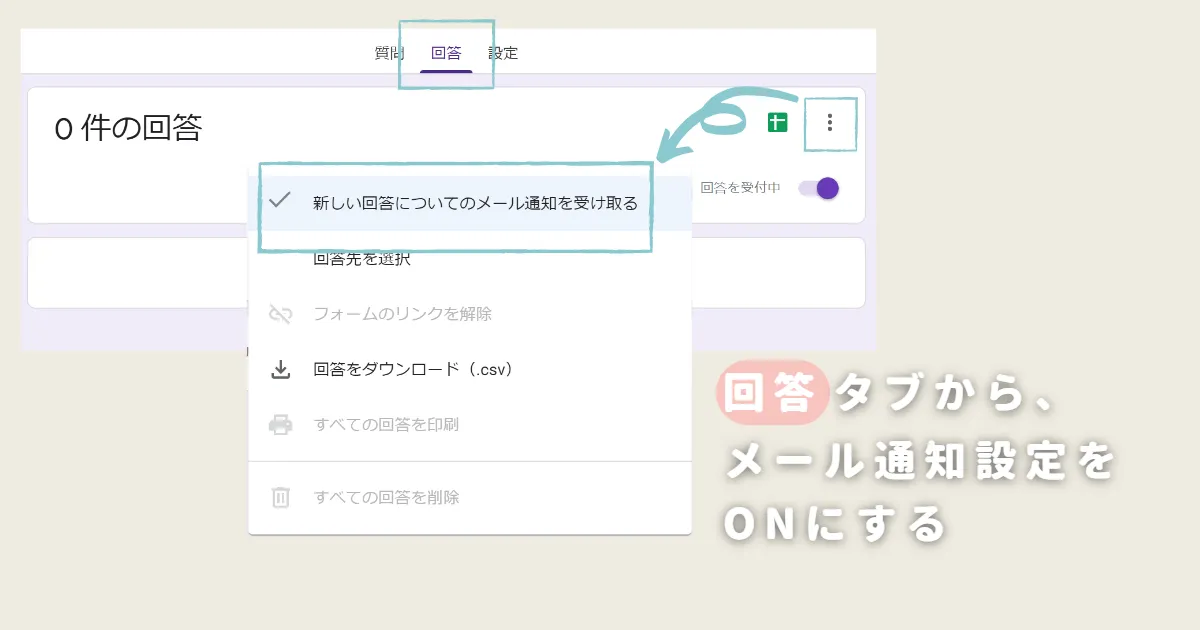
この設定をしておくと、お問い合わせがあったときにメールでもお知らせが来るので安心ですよ◎
念のため、設定後に自分でもお問い合わせフォームから回答して、ちゃんとメールが届くか確認してみましょう◎
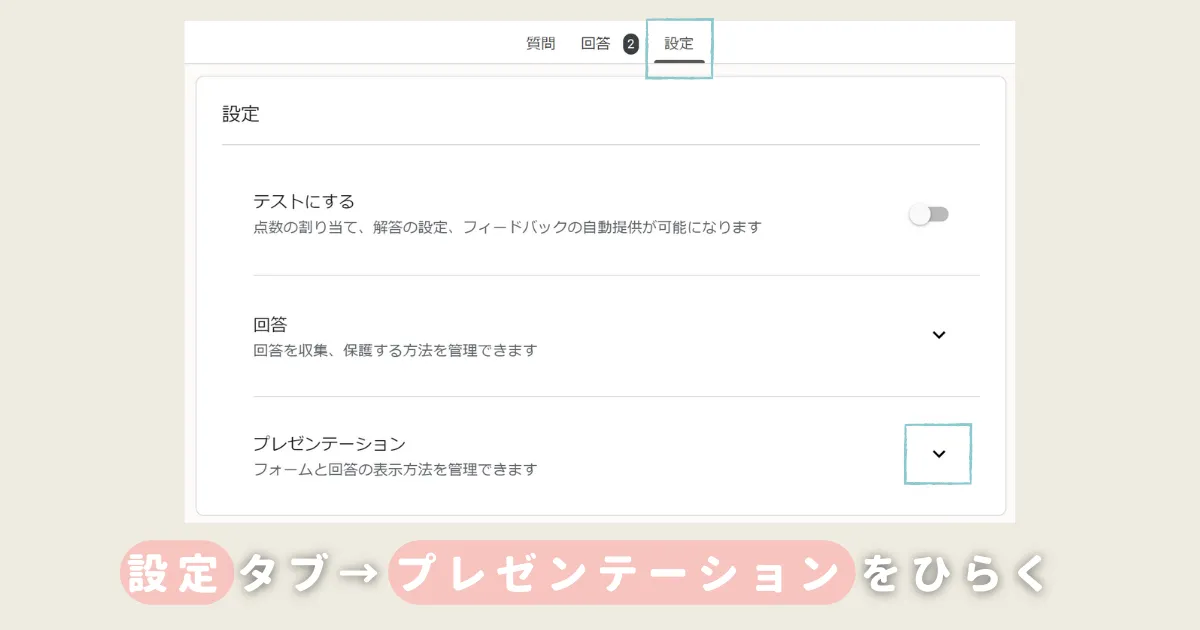
②確認メッセージ設定
お問い合わせを送信したあとに表示される確認メッセージは、デフォルトでは英語での表示になっています。
以下の方法でメッセージを編集できるので、お問い合わせフォームに沿ったメッセージを表示させておきましょう。
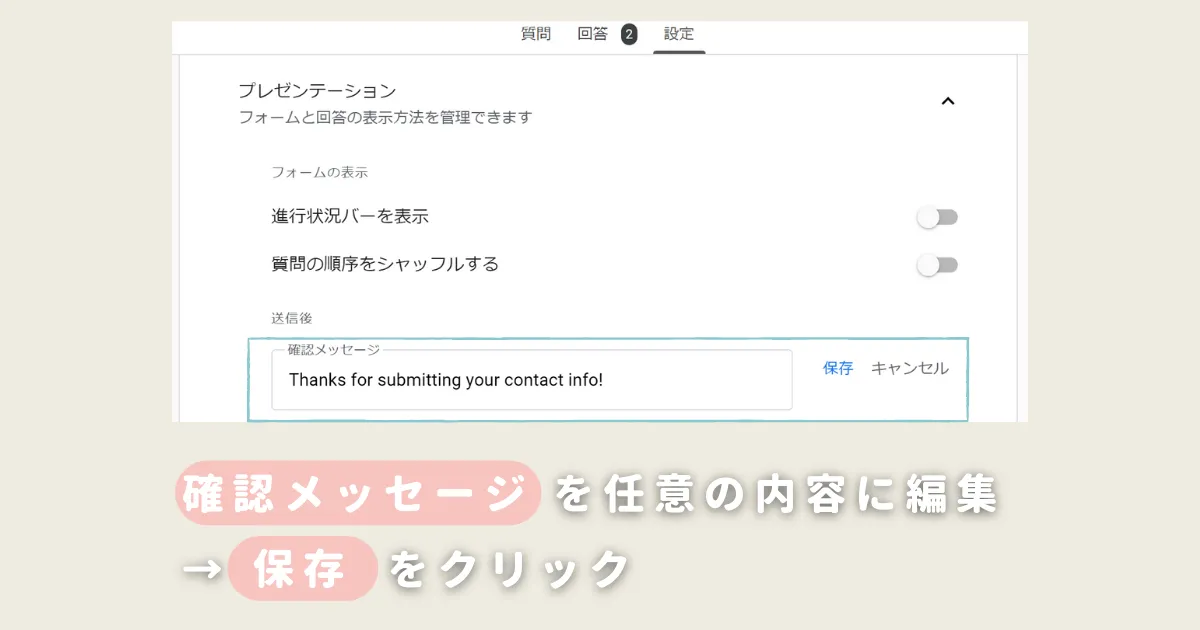
ほかにも設定項目があるので、必要に応じて設定してみてくださいね^^
ブログのお問い合わせページはGoogleフォームで代用しよう!
ブログのお問い合わせフォームについて、プラグインを使わずにGoogleフォームで代用する方法をご紹介しました。
お困りさんプラグインをあまり増やしたくないな…
とお考えの方にはとてもおすすめなので、今回ご紹介した内容を参考にしてみてください。
またGoogleフォームは操作方法に慣れておくと、お問い合わせフォーム以外に活用する際にも役立ちます。
お仕事でアンケートを作るときも、簡単に素早く作れましたよ♩
とても簡単に操作できるので、ぜひ一度操作画面に触れてみてくださいね^^
・ ・ ・
ワードプレス初心者の方におすすめしたいテーマ『SWELL』
- 簡単におしゃれなブログが作れる
- 記事の執筆にストレスがかからない
- かゆいところに手が届く感動的な使い心地
SWELL利用歴1年の本音レビューはこちら!


しの